Knife Skills for Home Cooks— The 3 Cuts That Change Everything
Home cooking has changed with all the technique noise flying around. Julienne, brunoise, chiffonade, batonnet— you read one article and suddenly feel like you need a culinary degree just to make stir fry on a Wednesday night.
This article includes affiliate links. We may earn a commission at no extra cost to you.
Here’s what I figured out: three techniques handle roughly 95 percent of real home cooking. The rock chop, the claw grip, and the julienne. Master those and the rest is just noise. Everything else— optional. The revelation came on a Tuesday afternoon when my chef friend watched me mangle an onion for forty seconds, quietly took the knife from my hands, and said, “You’re working too hard.” That was 2019. I haven’t cooked the same way since.
The Rock Chop: Your New Default
But what is the rock chop? In essence, it’s a continuous rocking motion where your knife tip never leaves the cutting board. But it’s much more than that— it’s the difference between controlled, rapid cutting and the exhausting lift-and-drop method that most home cooks default to without ever being told there’s another way.
Most people grip the handle, raise the blade, drop it. Lift. Drop. Lift. Drop. It’s slow, it’s tiring, and the blade leaves your control at the top of every stroke. That’s the moment things go wrong.
The rock chop works differently. Your knife stays in contact with the cutting board the entire time.
How to Actually Do This
Place your chef knife on the cutting board with the tip touching the surface. That tip is your pivot point— it doesn’t move. The handle rocks back and forth like a seesaw, with the tip as the fulcrum. Push the blade downward and forward in one smooth motion, keeping the tip planted. Then rock backward, lifting the heel slightly to clear the vegetable. Forward, backward. That’s it. That’s the whole thing.
Start with an onion. Halve it, put the flat side down— prevents rolling, which matters— and practice the motion without pressing hard. Just get it into your muscle memory first. Then add pressure. The first time I did this properly, a medium onion that used to take me ninety seconds took thirty. Not an exaggeration.
Probably should have opened with this section, honestly. Most people who think they’re terrible at knife skills just never learned this one motion. You’ll know you’ve got it when the knife makes a rapid tap-tap-tap instead of that heavy thunk from lifting and dropping. The sound changes. Then you know.
Why faster? You’re not fighting gravity— you’re using the knife’s own weight and a basic mechanical advantage. Continuous motion instead of choppy individual strokes. Why safer? The blade never loses contact with the board. No moment where it’s airborne and you’re guessing where it’ll land. Everything stays predictable.
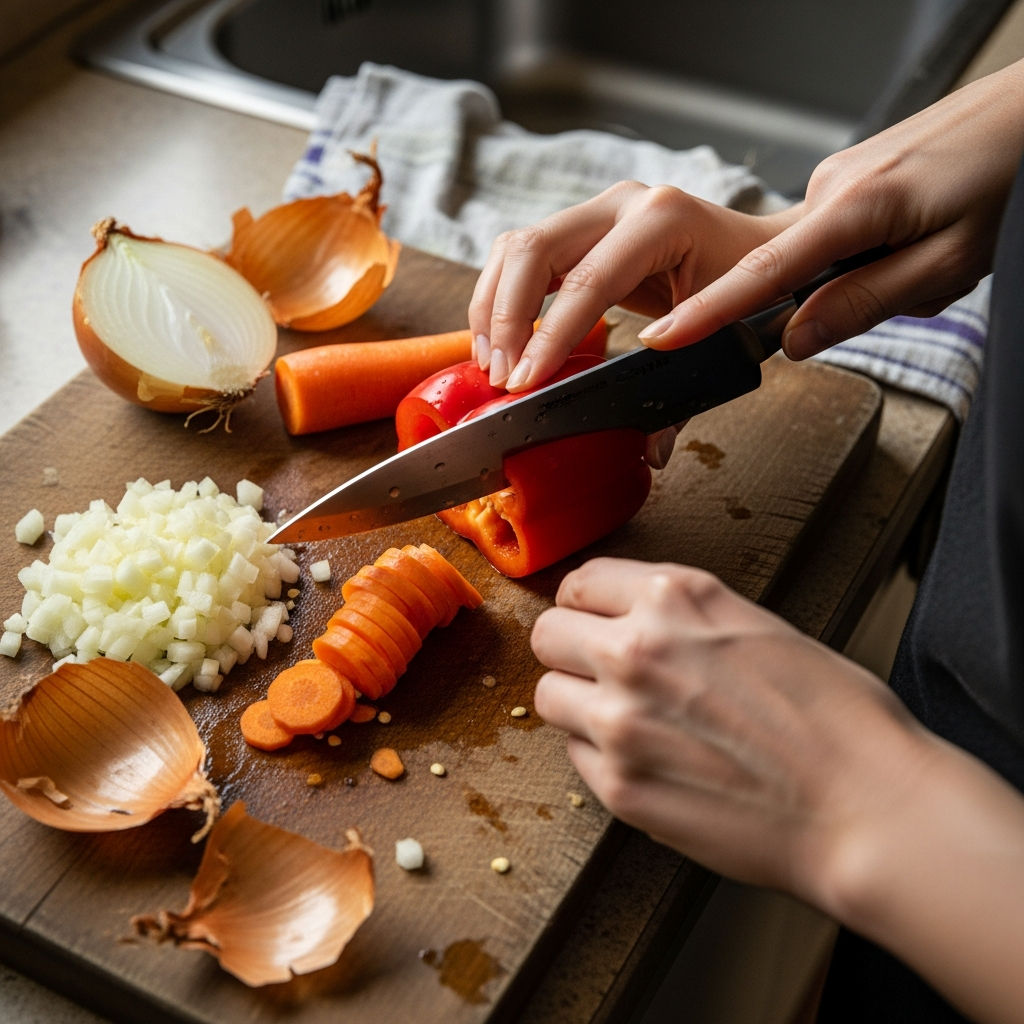
The Claw Grip: Why Your Fingers Are Still Attached
I’m apparently someone who learns safety lessons the hard way— three months before I discovered this grip, I was slicing zucchini with my fingers directly in the blade’s path. The knife caught the edge of my fingernail instead of the nail bed, and I stood there for a full minute just staring at my hand. That was luck. Not skill. Don’t make my mistake.
The claw grip is the safety system that actually works. Every culinary school teaches it in week one. Every professional chef uses it automatically. It’s the technique that protects you specifically when you’re tired or distracted— which, honestly, is when most home cooking happens.
The Setup
Curl your fingertips inward on your non-knife hand, like you’re making a loose fist— a claw shape. Your knuckles are exposed. Your fingernails are completely tucked away. Your knuckles face the blade.
Now the crucial part: the knife blade rides along your knuckles as you slice. Not in front, not behind— along them. Your knuckles become a guide rail. As you chop, your knuckle position slides slowly backward, pushing the vegetable forward while the blade moves in the opposite direction. The blade never reaches your fingertips. It only ever contacts the hard, curved surface of your knuckles.
When I started using this grip, my speed improved immediately— not because I got technically better, but because I stopped cutting slowly out of fear. I had actual protection instead of just hope. After about a week, it became automatic. Hand just did it.
The One Adjustment That Matters
Position your knuckles about half an inch ahead of where the blade makes contact. That gap accounts for the blade’s thickness and keeps your knuckles from getting too close. Small detail. Significant difference.
Practice with a bell pepper first— it’s large, your hand stays comfortable, and there’s no pressure. Once that feels natural, move to smaller items like garlic cloves or hot peppers. Same principle, smaller scale.
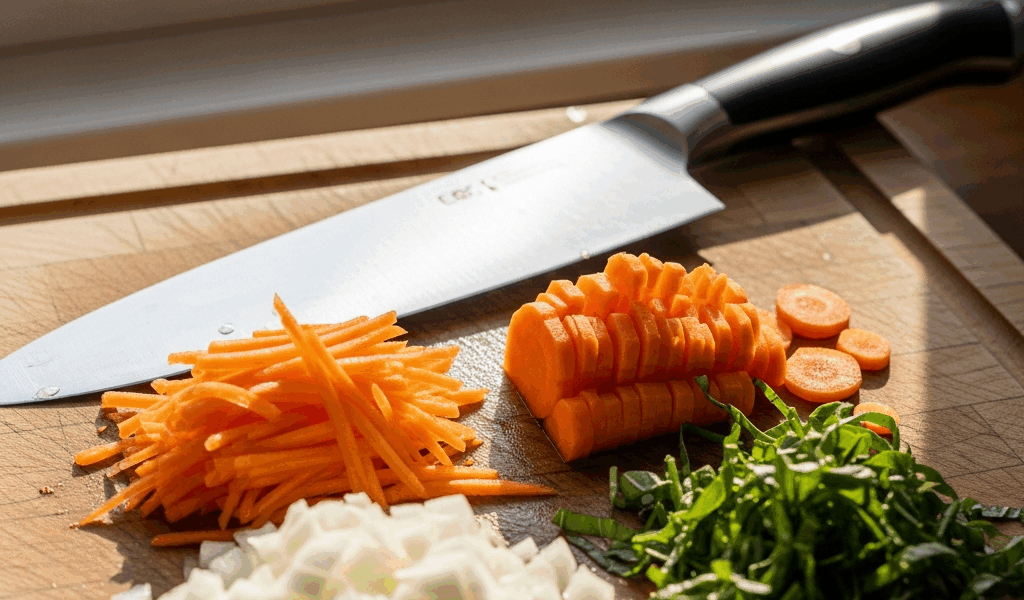
The Julienne: The Only Fancy Cut Worth Learning
But what is a julienne? In essence, it’s a thin matchstick cut— roughly 2 millimeters wide, 2 to 3 inches long, about the dimensions of an actual wooden match. But it’s much more than a pretty presentation technique. That’s what makes the julienne — it genuinely changes how food behaves in the pan.
Thick carrot chunks take twelve minutes to soften in a stir fry. Julienned carrots take four. Surface area is the reason. Professional cooks don’t do this to show off— they do it because it works, and the results taste noticeably different. So, without further ado, let’s dive in.
Step-by-Step
Start with something firm and cylindrical— a carrot is ideal. Not round vegetables yet. Round things roll and that’s a problem you don’t need while learning.
- Trim the carrot into a rectangular block about 3 inches long. You’re removing the curved sides that would roll under the knife. A block roughly 1 inch square in cross-section is perfect.
- Place the block flat-side down. Claw grip on the vegetable.
- Slice lengthwise into thin planks— roughly 2 millimeters thick, about as thick as a dime. Don’t stress if the first few aren’t uniform. By plank number five, your hands will have sorted it out.
- Stack the planks on top of each other. Claw grip again— knuckles guide the blade.
- Slice the stack lengthwise again into matchsticks. Uniform width is what makes this an actual julienne instead of “some strips I cut.” Length variation is fine.
One medium carrot takes about ninety seconds once you’re comfortable. Frustrated by irregular cuts at the beginning, most people quit before they feel the technique click— usually around the third or fourth carrot. Push past that point.
Where You’ll Actually Use This
Stir fries are the obvious application. Julienned carrots, zucchini, and bell peppers cook faster and eat more pleasantly than chunky versions— less chewy, more surface caramelization. Salads benefit too. And if you toss julienned sweet potato with olive oil, a half teaspoon of salt, and roast at 425°F for about 15 minutes, you get something that genuinely competes with restaurant fries. Costs maybe sixty cents to make.
While you won’t need formal culinary training for this cut, you will need a handful of cheap practice carrots and about twenty minutes of repetition. First, you should start with carrots before attempting zucchini or cucumber— at least if you want the technique to feel natural before the vegetable starts squishing under the blade. Carrots are firm and forgiving. Softer vegetables come later, once your hands know what they’re supposed to do.
Knives You Actually Need (Just Two)
While you won’t need a twenty-piece block set, you will need a handful of good tools— specifically two knives. That’s genuinely all. Those big block collections are marketing. Most of those blades never leave the block.
The Chef Knife— 8-Inch
This handles the rock chop, most julienne work, slicing meat, breaking down vegetables— everything. An 8-inch blade is the practical sweet spot. Ten-inch feels unwieldy at home. Six-inch feels cramped once you’ve worked with proper proportions.
I’m apparently someone who resisted spending real money on knives for years— a $180 German chef knife collected dust in my parents’ kitchen while the $34.99 Victorinox Fibrox Pro 8-inch I bought from Amazon became my daily driver. I’ve used mine for three years. Edge retention is solid, the handle is comfortable for long sessions, and damaging it while learning won’t devastate you. The Mercer Culinary Genesis 8-inch runs about the same price and performs comparably. Either one outperforms anything in a forty-piece block set.
The Paring Knife
A 3.5-inch blade. Use it for peeling garlic, deveining shrimp, removing seeds from jalapeños, anything requiring precision over power. The Victorinox paring knife— about $9 on a good day, rarely more than $15— is legitimately excellent. No caveats. Just buy it.
Total equipment budget: roughly fifty dollars for two knives that handle every cutting task home cooking throws at you. That’s the whole list.
One Important Thing About Maintenance
Hand wash both. Not the dishwasher— ever. Dry immediately after washing. Store in a block or on a magnetic strip, not loose in a drawer where they roll around dulling against other utensils. Sharpen a few times a year with a basic pull-through sharpener— the KitchenIQ Edge Grip 2-Stage Sharpener runs about eight dollars and works fine for home use.
A sharp knife is safer than a dull one. Counterintuitive, but absolutely true. Dull knives require force. Force creates slipping. Slipping creates the emergency room conversation about how you injured yourself cutting a carrot.
The Actual Practice
This new approach to knife skills took off for me several years ago and has eventually evolved into something enthusiasts know and rely on— but it still takes real repetition to internalize. The rock chop feels natural after about three ten-minute sessions. The claw grip takes roughly a week of conscious use before it becomes automatic. The julienne takes longer— maybe two weeks before you stop narrating each individual step to yourself.
Practice with cheap vegetables. Onions are eighty-nine cents. Carrots come in two-pound bags for under two dollars. Zucchini runs about a dollar each. You don’t need farmer’s market heirlooms for skill-building. You need repetition with whatever’s cheapest at the store that week.
Once these three techniques live in your hands instead of your head— genuinely automatic— everything shifts. You cook faster. The prep work stops feeling like an obstacle. You actually look forward to the cutting part instead of treating it as something to get through. That’s when you realize you were never bad at this. You just needed three specific things, and nobody bothered to tell you which three.


Stay in the loop
Get the latest home cuisine delights updates delivered to your inbox.