How to Build Flavor in Cooking— The Technique Restaurant Cooks Use That Home Cooks Miss
Cooking has changed with all the “secret tips” and “game-changing hacks” flying around. Spoiler: it’s not a secret ingredient. It’s not a $400 pan. It’s understanding five specific mechanisms— and then using them deliberately, every single time.
What follows isn’t a listicle. It’s a framework. Learn these five things and you stop being someone who follows recipes and start being someone who actually cooks.
The Maillard Reaction— Why Browning Is Flavor
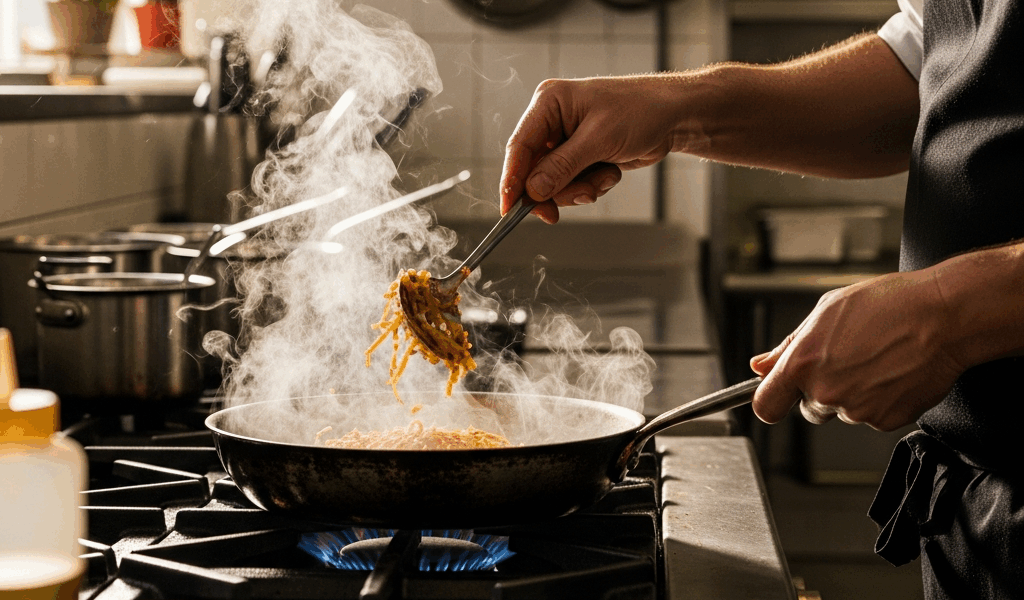
But what is the Maillard reaction? In essence, it’s a chemical process between amino acids and reducing sugars that kicks in somewhere above 280°F (140°C). But it’s much more than that— when those compounds collide at that temperature, they generate hundreds of entirely new flavor molecules. Molecules that flat-out don’t exist in raw or boiled food.
That’s the whole story behind why a seared steak tastes nothing like a boiled one. Same meat. Same protein. The boiled version just never gets hot enough to trigger the reaction, so those flavor compounds never happen. The brown crust isn’t decorative. It isn’t “sealing in juices”— that’s a myth, incidentally, and a stubborn one. It is flavor. Dense, irreplaceable, can’t-fake-it flavor.
The practical side is pretty straightforward once the mechanism clicks. Moisture wrecks everything here. Water sitting on the surface of a chicken breast will boil at 212°F— keeping the surface temperature stuck well below that 280°F threshold. The surface steams instead of browns. You get gray, sad meat and a pan full of liquid.
The fix: dry your proteins. Completely. I go through half a roll of Bounty every time I sear anything and I have zero guilt about it. Then— hot, dry pan. My 12-inch Lodge cast iron skillet, a battered L10SK3 I’ve had for about eight years, goes over medium-high for a full three minutes before oil touches it. Add the oil, wait for the shimmer, lay down the protein. Then don’t touch it. Don’t nudge it. Don’t peek under the edge every thirty seconds out of anxiety. A proper crust releases from the pan on its own. If it’s sticking, it’s not ready.
Frustrated by years of pale, stuck-everywhere chicken, I finally just left a thigh completely alone for six full minutes— and pulled it up to find a mahogany crust that smelled like an actual restaurant kitchen. That was the moment things shifted for me.
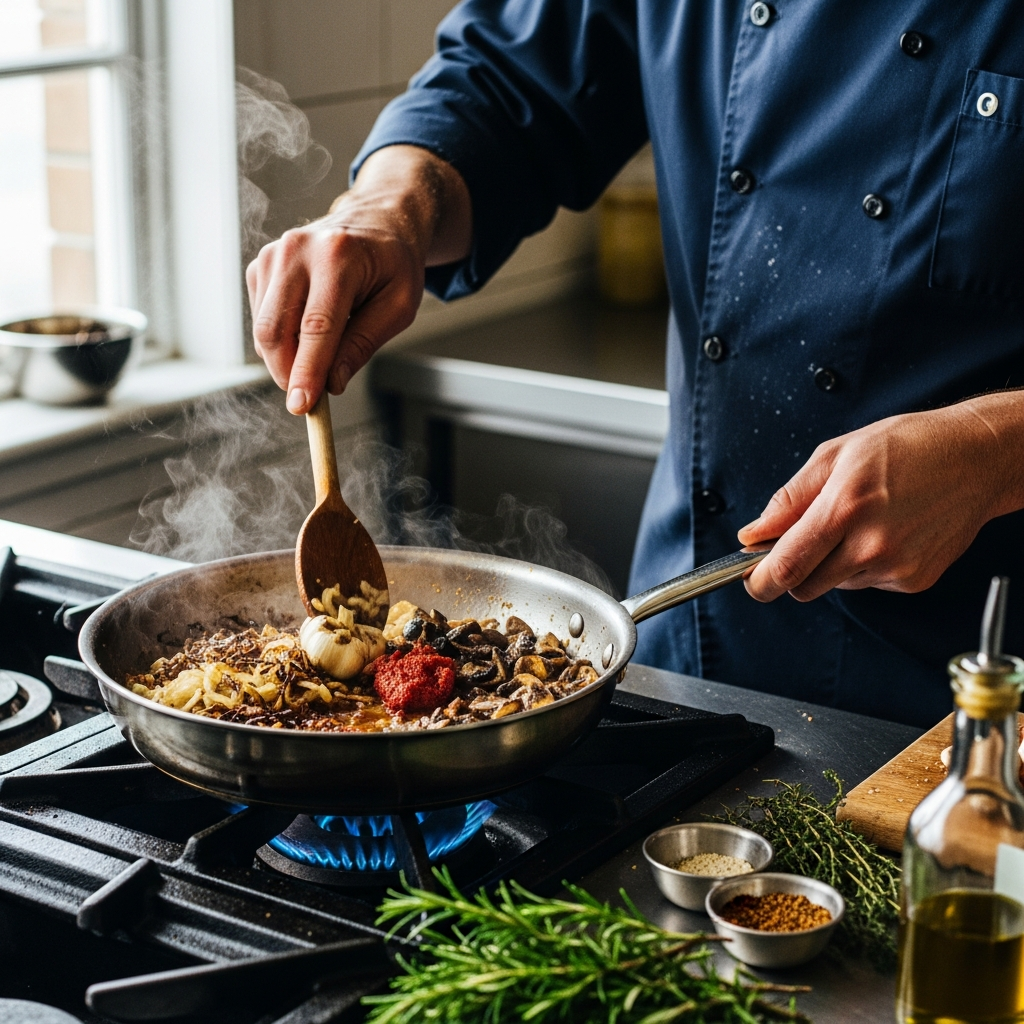
Building a Fond— The Flavor You Cannot Buy
After a proper sear, the pan bottom looks wrecked— covered in dark brown residue that most home cooks either panic about or immediately hit with dish soap. Don’t make my mistake. Restaurant cooks look at that mess and see the beginning of a sauce.
That residue is fond. Concentrated Maillard products, essentially— distilled browning flavor that’s fused to the pan surface. It took me an embarrassing stretch of years before I stopped treating it as burnt garbage and started treating it as an ingredient.
The move is deglazing. Remove your protein, then pour a liquid— wine, stock, beer, even plain water— into the hot pan and scrape the bottom with a wooden spoon or flat spatula. The hot liquid dissolves the fond and pulls it up into suspension. That liquid becomes your pan sauce, and it carries every bit of that Maillard flavor with it.
A few specifics that actually matter:
- About ½ cup of liquid for a 10 or 12-inch pan. More than that and you’re diluting the whole point.
- Dry white wine for chicken and fish. Red for beef and lamb. A dry sherry with pork— honestly outstanding.
- Don’t let the pan cool first. The sizzle when liquid hits the hot surface is what physically loosens the fond.
- If the pan looks clean after searing, something went wrong— either the heat was too low or the protein wasn’t dry enough. Circle back.
The mistake I watched myself make constantly: pulling the protein, then pouring everything into a clean saucepan to build the sauce “properly.” All the flavor stayed behind in the pan I just abandoned. The dirty pan is the point. That’s what makes deglazing so who finally figure it out— it feels like cheating, but it isn’t.
Acid and Brightness— The Finish That Lifts Everything
Probably should have opened with this section, honestly. Because this one adjustment— zero technique required— makes an immediate, noticeable difference the very first time you use it.
Acid isn’t salt. They do completely different things. Salt works on intensity— it makes food taste more like itself. Acid works on brightness— it adds clarity, lift, what some cooks describe as flavors “opening up.” A dish that’s properly salted but still tastes flat, heavy, or muddy almost always needs acid. Not more salt.
Here’s the mechanism: acid compounds interact with your taste receptors in a way that heightens perception of other flavors— particularly aromatics. It also cuts through richness and fat, which explains why lemon over fried fish works so well. The lemon isn’t really adding flavor so much as it’s clearing the path to taste what’s already there.
Timing is everything, though. Lemon juice, lime juice, champagne vinegar, sherry vinegar— these contain volatile aromatic compounds that evaporate fast under heat. Cook them more than a minute or two and you lose the bright notes entirely. You’re left with tartness and no aroma. Flat in a different direction.
So— add acid last, off heat. A squeeze of lemon over finished pasta. A tablespoon of sherry vinegar stirred into a braise right before it hits the table. A splash of white wine vinegar in a pan sauce with the burner already off. I use Trader Joe’s Organic White Wine Vinegar— $2.99 for a large bottle, been buying it for years. Start with less than feels right. A quarter teaspoon at a time. Taste. Adjust. You can add more; you can’t remove it.
Hardy vinegars like balsamic handle longer cooking just fine and work well mid-process. But anything with a fresh, bright character— citrus, champagne vinegar, white wine vinegar— belongs at the very end, after the heat is off.
Fat as a Flavor Vehicle
Fat does two distinct things in flavor development— and understanding both changes how you deploy it.
First, fat carries flavor. The aromatic compounds in garlic, fresh herbs, dried spices— virtually all of them are fat-soluble, not water-soluble. They develop more fully and distribute more completely when cooked in fat rather than water. Garlic sautéed in a couple tablespoons of olive oil releases its flavor compounds into that oil, which then spreads them throughout the entire dish. Garlic boiled in water? Most of those compounds stay trapped and drain away with the liquid.
Second, fat extends how long you perceive flavor. A dish finished with butter or good olive oil coats the palate— which physically prolongs contact between flavor compounds and your taste receptors. This is a big part of why restaurant food feels richer and lingers longer than home cooking. Professional kitchens use more fat than seems reasonable, especially butter, and they use it at the end.
The specific technique here is monter au beurre— mounting with butter. Once the pan sauce is built and seasoned, pull the pan completely off heat. Cut cold butter into small pieces— I cut a tablespoon into four rough chunks— and swirl the pan continuously without returning it to the burner. Cold butter emulsifies into the hot liquid instead of just melting into a greasy split. The result is a glossy, spoon-coating sauce with actual body.
Pan must be off heat— hot enough to melt the butter, not hot enough to break the emulsion. About 60 seconds of swirling with two tablespoons of butter. Watch for the sauce to go from thin and translucent to opaque and glossy. When it coats the back of a spoon and holds a clean line when you drag a finger across it— done.
Timing— When You Add Aromatics Changes the Flavor
The same ingredient, cooked differently, tastes completely different. This sounds obvious the moment someone says it out loud. It took me years to actually internalize it.
Garlic is the cleanest example. Garlic added early in a long braise— say, 45 minutes in, submerged in liquid— mellows almost entirely. The sharp, pungent compounds break down. What’s left is sweet, nutty, nearly invisible— present as background depth rather than as a distinct flavor. That same garlic added five minutes before serving is sharp, assertive, bright, and immediately identifiable as garlic. Both versions are correct. The question is what you’re trying to accomplish.
The principle extends across every aromatic:
- Tough, woody herbs— thyme, rosemary, bay leaf, sage— have durable flavor compounds that develop and integrate over long cooking. Add them early. A bay leaf dropped into a sauce with two minutes left does almost nothing.
- Delicate fresh herbs— parsley, basil, tarragon, chives, cilantro— lose their primary flavor compounds fast under heat. Add them after the pan comes off the burner, or at the absolute last second. This is why finishing with a fistful of fresh parsley works, and why adding that parsley twenty minutes earlier leaves you with nothing.
- Dried spices bloom most effectively when cooked briefly in fat right at the start— what Indian cooking calls a tarka. Thirty seconds of cumin seeds in hot oil releases fat-soluble aroma compounds that then travel throughout the whole dish. That same cumin stirred directly into a water-based sauce delivers a fraction of the flavor, apparently, though it took me way too long to figure out why.
Blooming spices in fat at the start, building fond through the middle, finishing with acid and mounted butter at the end— these aren’t separate tips. This new idea took off for me several years into cooking and eventually evolved into the framework enthusiasts know and rely on today. Each stage feeds the next, and together they produce the kind of layered, complex flavor that makes restaurant food taste like restaurant food even when the recipe itself is completely unremarkable.
How These Mechanisms Work Together
Restaurant cooking doesn’t produce better-tasting food because professional kitchens start with better ingredients. A restaurant buying boneless chicken thighs in bulk from a food service distributor is not working with superior raw material. What’s different is the deliberate, consistent application of these mechanisms— every dish, every time, no exceptions.
Dry the protein. Hot pan. Build fond. Deglaze. Bloom aromatics in fat at the right moment. Finish with acid off heat. Mount with butter. None of this is complicated. None of it requires culinary school or specialized equipment. It requires understanding why each step works— and once the why clicks, the what becomes habit rather than memorization.
While you won’t need a professional range or a brigade of cooks, you will need a handful of basics: a heavy pan that holds heat, cold butter, something acidic worth finishing with, and patience during the sear. First, you should get the drying-and-hot-pan part right— at least if you want anything else here to matter, because the whole sequence builds from that foundation. A cast iron skillet might be the best option, as building proper fond requires consistent, retained heat. That is because thin, cheap pans shed temperature the moment cold protein hits the surface— and then you’re back to steaming instead of browning.
Next time you make something simple— a chicken breast, a weeknight pasta, scrambled eggs even— run this framework through your head. Ask which mechanisms apply. The answer will improve the dish. That’s not a promise I make lightly.


Stay in the loop
Get the latest home cuisine delights updates delivered to your inbox.