Why Your Bread Comes Out Dense Every Time
Bread baking has gotten complicated with all the conflicting advice flying around. As someone who’s been baking seriously for about eight years, I’ve learned everything there is to know about dense loaves — mostly by making every possible mistake myself. Today, I’ll share it all with you.
Here’s the thing: you follow the recipe exactly. You wait. You slice into what should be a beautiful loaf and find a brick. That moment is genuinely demoralizing. But dense bread is almost never a talent problem. It’s a diagnostic one. This article helps you find your exact failure point instead of running through a generic checklist and hoping something sticks.
The Most Likely Culprit — Your Yeast Is the Problem
Start here. Seriously. Roughly 60% of home bakers dealing with dense bread are actually fighting dead or dying yeast — they just don’t know it yet. I spent six months blaming my oven before I figured out I’d been storing yeast in a cabinet directly above my stove. Warm air rises. Yeast dies quietly.
But what is the real issue with bad yeast? In essence, it’s a gas production failure. But it’s much more than that. Your dough might still rise a little. It might even look fine during the bulk fermentation. Without enough active yeast cells working, though, you’ll never get the gas volume needed to create a light, open crumb.
Check Your Yeast First
Dead yeast comes from three places: expiration, heat exposure, or water that was too hot during mixing. Pull out your yeast container right now and look at the date. Instant yeast — I use SAF Red Label, about $6 for a pound bag from King Arthur — stays viable roughly four years sealed, less once opened. Active dry lasts a bit longer on paper, but I wouldn’t push it.
Storage matters more than most people realize. Your fridge or freezer is ideal. A small glass jar with a tight lid works perfectly. Room-temperature cabinets, especially anything near the stove or oven, age yeast fast. Don’t make my mistake.
The Float and Foam Test
Before anything else, do this. Warm your water to between 100 and 110°F — use a thermometer, not your wrist. Below 90°F, yeast won’t activate properly. Above 120°F, it’s dead on contact. Add one teaspoon of sugar and your measured yeast. Wait five minutes.
Good yeast foams visibly. It climbs up the sides of the cup and smells alive and slightly funky in the best way. Dead yeast just sits there. No foam means no bread — at least not bread worth eating. Toss it, grab fresh yeast, and start over before you burn another two hours on a loaf going nowhere.
Most recipes tell you to dissolve yeast in warm water first. That’s the actual reason why. You’re running a viability check before committing to the whole process.
How Kneading (or Not Enough of It) Ruins the Crumb
Under-kneaded dough is the second biggest culprit. This one confused me for years — my dough looked smooth, so I assumed it was ready. Smooth and developed are not the same thing. I learned that the hard way through probably a dozen dense loaves.
Kneading builds gluten strands. Those strands form a web that traps gas bubbles from fermentation. Without a proper network in place, the dough can’t hold air. Structure collapses during baking. Density is what you get.
What Under-Kneaded Dough Actually Feels Like
Under-kneaded dough feels soft, a little sticky, and tears easily when you pull it. Poke it and it doesn’t spring back with any energy. It feels almost fragile. That’s where most home bakers stop — it seems done. It isn’t.
Properly kneaded dough is a different animal. Smooth, elastic, responsive. It pushes back when you poke it. You can stretch a small piece nearly transparent without it tearing. That last quality is the whole ballgame.
The Windowpane Test
Tear off a golf ball-sized piece. Stretch it slowly between your fingers. Tears immediately? Keep kneading. Stretches thin enough to see light through without breaking? You’re done. That’s the windowpane test, and it’s the only reliable marker of proper gluten development I’ve found.
By hand, expect 10 to 12 minutes of real effort. Stand mixer on medium — I use a KitchenAid with the dough hook — takes 6 to 8 minutes. Don’t go by the clock alone, though. Hydration levels and flour type shift everything. The windowpane test tells the truth.
Over-Kneading — The Smaller Problem
You can over-knead, but it’s genuinely rare at home. We’re talking 20-plus minutes by hand or a stand mixer running on high for 15 minutes straight. Over-kneaded dough gets sticky again and loses elasticity — it starts breaking down instead of stretching. If you notice dough falling apart during shaping, that’s your signal. Scale back the time a bit. Most home bakers will never hit this problem.
Proofing Mistakes That Collapse Your Loaf
Proofing is where timing gets genuinely weird. Under-proofing and over-proofing both produce dense bread — they just wreck it through completely different mechanisms. That’s what makes proofing endearing to us bread nerds. There are two ways to fail and they look almost identical in the finished loaf.
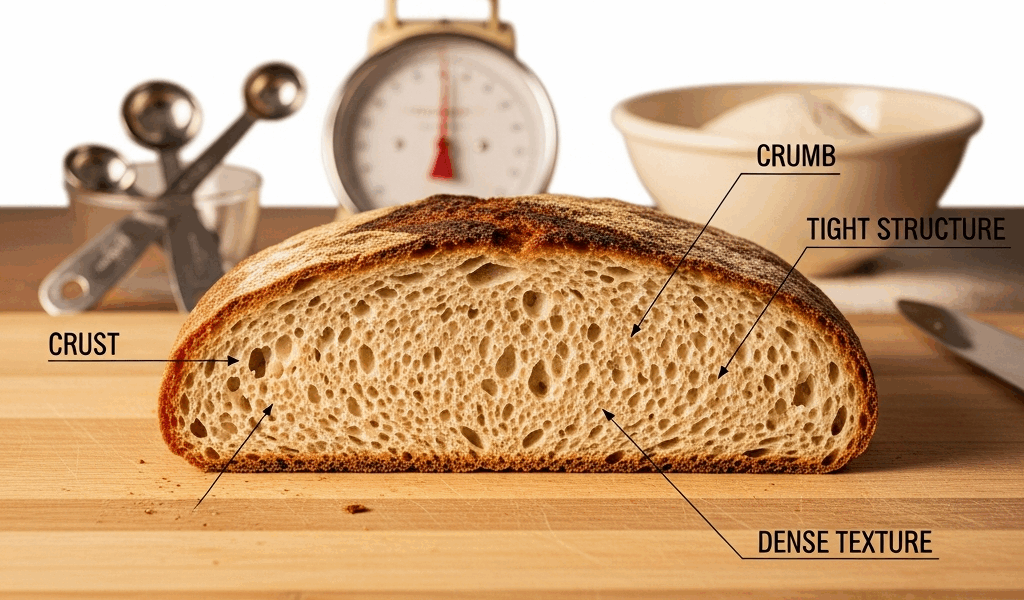
Under-Proofing Creates Tight, Stubborn Crumb
Under-proofed dough hasn’t generated enough gas yet. You bake it before fermentation finishes. The oven spring happens — heat expands things fast — but without adequate gas bubbles already in the structure, the crumb comes out tight and dense. Cold kitchens are the sneaky cause here. A 68°F room ferments much slower than a 75°F one. Recipe timings are written for warm kitchens, not yours.
Over-Proofing Collapses Structure
Over-proofed dough has gone too far. The gluten network exhausts itself holding all that gas and loses structural strength. Shape it or hit it with oven heat and it deflates. The result is flat, dense bread with almost no spring. The dough looks puffy right up until it doesn’t.
The Poke Test — Your Proofing Guide
Flour your fingertip. Poke the dough once, gently. Springs back immediately? More time needed. Springs back slowly over two or three seconds? You’re ready. Doesn’t spring back at all, leaves a permanent indent? Over-proofed. Aim for that slow, lazy spring-back. That’s your baking window.
Creating Warmth Without Special Equipment
Turn on your oven light — just the light, nothing else. Close the door. The bulb generates a surprisingly consistent 75 to 80°F microclimate inside. Put your dough in there and check every 20 minutes. This single trick eliminates most under-proofing problems in cool kitchens.
Probably should have opened with this section, honestly. So many people are fighting proofing times simply because their kitchen runs five degrees cooler than whatever kitchen the recipe developer was standing in.
Measuring Flour Wrong — The Mistake Most Recipes Ignore
This one feels like cheating once you know it. Scooping your measuring cup directly into the flour bag packs it down — you’re compressing flour without realizing it. End result: 20 to 30% more flour than the recipe actually calls for. Extra flour means a dry, stiff dough. Stiff dough means dense bread.
Professional bakers weigh everything in grams. Most home recipes assume you’re using the spoon-and-level method instead. Spoon flour into the cup until it’s mounded slightly, then level with a straight edge. That’s the measurement the recipe was developed around.
Spoon-and-Level Versus Scoop-and-Pack
The difference between scooping and spooning can amount to nearly a full extra cup of flour in a standard loaf. That’s enormous. I’m apparently a chronic scooper and this was wrecking my bread for years before someone finally explained it — a $12 kitchen scale from Target eventually fixed everything. Weigh your flour. Recipes listing grams eliminate this entire category of error completely.
Quick Checklist Before Your Next Loaf
- Yeast: Check the expiration date. Run the foam test — water at 100 to 110°F, one teaspoon sugar, wait five minutes for visible foam.
- Kneading: Skip the clock and use the windowpane test. Thin stretch without tearing means you’re actually done.
- Proofing: Use the poke test. Slow spring-back is your target. Oven light trick if your kitchen runs cold.
- Flour: Spoon into the cup, level with a knife — don’t scoop. A cheap kitchen scale removes the guesswork entirely.
- Timing: One of these four things is almost certainly the problem. Not all four at once.
Dense bread is a fixable skill problem. Walk your process back methodically, find the one thing that went wrong, and correct that single point. So, without further ado — go bake another loaf. The next one will be better.


Stay in the loop
Get the latest home cuisine delights updates delivered to your inbox.