The Real Reasons Your Cookies Spread Too Much
Cookie baking has changed with all the conflicting advice flying around. Chill the dough. Don’t chill the dough. Use bread flour. Use cake flour. Blame the oven. Blame the butter.
Most articles hand you a list of five vague fixes and send you off. That’s not what this is. We’re going to figure out which specific thing went wrong in your last batch before you change anything at all. The butter? The flour measurement? A pan that’s been in your cabinet since 2011? Your oven quietly running hotter than you realize?
Four culprits cause nearly every cookie-spreading disaster home bakers run into. Probably just one of them is your actual problem. So, without further ado, let’s dive in.
Your Butter Was Too Warm or Too Melted
Softened butter should still hold its shape. Press a finger into it— you want a dent that stays put. It should feel cool enough that you’re comfortable holding it. Shiny? Greasy? Starting to pool on the counter? You’ve gone too far.
When butter gets too warm, the fat and water separate before the eggs and dry ingredients have built any real structure. The dough puddles in the oven instead of setting up. You get flat, crispy-edged cookies with no substance— the kind that look like someone pressed them down with a spatula.
Probably should have opened with this section, honestly. Butter temperature is the number one culprit, and it’s the one most people overlook because softened butter looks fine until it suddenly isn’t.
I’m apparently very impatient about letting butter soften, and leaving it out for a full hour works for me in winter while that same method never works in July. Don’t make my mistake. Cut the butter into tablespoon-sized pieces and leave it out for 15 to 20 minutes max. The goal is butter that stirs easily into sugar but still pushes back when you cream them together— that resistance takes about 2 to 3 minutes with a hand mixer on medium.
Already melted it by accident? Stick it in the fridge for 10 minutes. Stir it every few minutes until it thickens and feels cool again. Tedious, yes. Worth it.
You Measured the Flour Wrong
But what is the “correct” way to measure flour? In essence, it’s spooning flour loosely into the cup and leveling it off. But it’s much more than that— it’s the difference between a 120-gram cup and a 140-gram cup, depending on how hard you scoop.
That’s roughly a 15 percent difference in your flour-to-fat ratio. For cookies, that’s enormous.
Less flour means less gluten structure. Less structure means more spread. The math is unpleasant and direct.
Use a spoon to transfer flour into the measuring cup, then drag a knife across the top. No packing. No shaking the cup to settle it. My kitchen scale— a $14 OXO model from Amazon— removes the guesswork entirely, but the spoon-and-level method is perfectly reliable if you’re consistent about it.
One more thing: humidity. If you live somewhere muggy, or you’re baking on a rainy afternoon, flour absorbs moisture from the air and gets heavier sitting in that measuring cup. Your dough ends up wetter than intended. There’s no clean fix without a scale, but knowing this helps— in high-humidity conditions, adding an extra tablespoon of flour and judging the dough texture from there is a reasonable move.
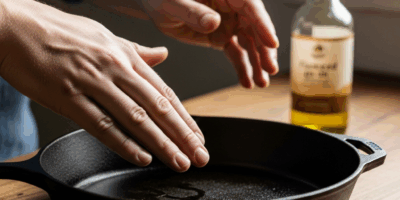
Your Baking Sheet and Oven Are Working Against You
Dark nonstick baking sheets— the kind most people own— absorb heat aggressively. That means your cookie bottoms brown and spread before the tops have time to set. Greased pans make this worse. The oil transfers heat directly into the dough.
Light-colored aluminum sheets are what you want. Nordic Ware makes a half-sheet pan for around $15 that’s become genuinely indispensable in my kitchen. Line it with parchment paper, not a silicone mat— silicone insulates so well it causes uneven browning. Parchment is the move.
That’s what makes baking sheet choice so obsessive home bakers— it seems trivial until it isn’t.
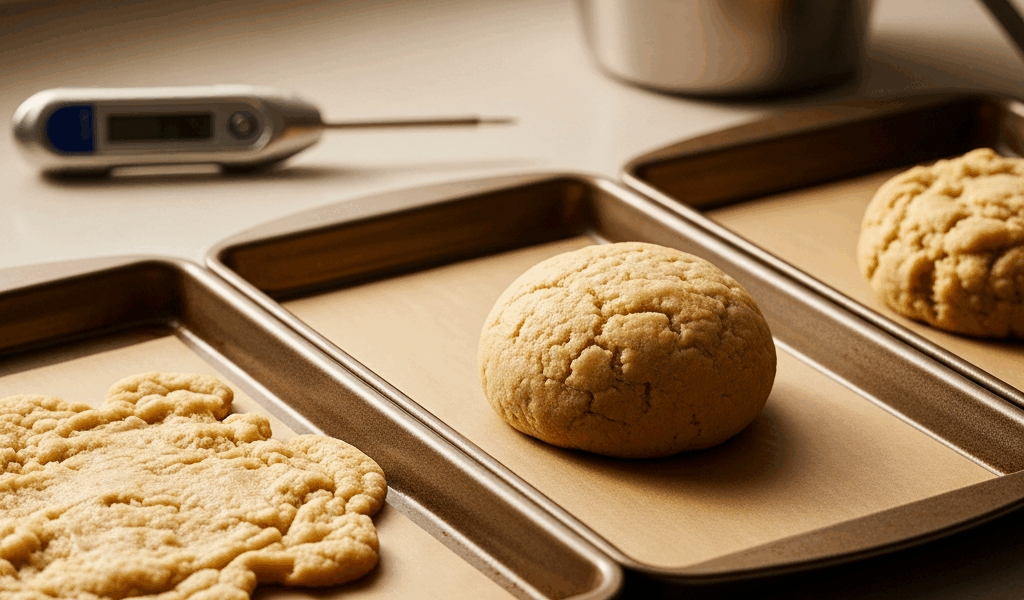
But here’s the bigger problem almost nobody suspects: the oven itself. Most home ovens run 25 degrees hotter or colder than the dial claims. I bought an oven thermometer for $8 at Target three years ago— a basic CDN model, nothing fancy— and it immediately showed my oven running about 20 degrees hot. Those 20 degrees spread cookies dramatically faster, especially thinner doughs.
Eight dollars. Fixes more baking problems than anything else on this list. Set it on the middle rack, let the oven preheat fully, and check the reading after 20 minutes. Adjust your dial accordingly. Check it every few months— ovens drift.
The One Fix That Solves Most Spreading Problems
Chilling the dough is the single most reliable fix in a baker’s arsenal. But what is chilling actually doing? In essence, it slows down fat melt. Cold butter entering a hot oven takes longer to liquefy, which gives the dry ingredients time to set up and form structure first. Warm dough goes into the oven and spreads immediately— the butter melts before anything else has a chance to firm up. But it’s much more than just cold fat.
Chilling also lets the flour fully hydrate. The dry ingredients absorb moisture from the eggs and butter over time, which strengthens the gluten bonds and helps the cookie hold its shape through the full bake.
Thirty minutes in the refrigerator is the bare minimum. Overnight is genuinely better— that’s not exaggeration. In a real rush? Twenty minutes in the freezer works, though cookies can bake unevenly that way.
Most serious cookie recipes build in chill time for exactly this reason. If yours doesn’t include it, add it anyway. The improvement is immediate and obvious.
Before your next batch, run through this checklist:
- Is your butter soft but still cool and firm enough to hold a shape?
- Did you spoon and level your flour, or scoop and pack?
- Are you using a light-colored pan lined with parchment on the middle rack?
- Have you checked your oven’s actual temperature with a thermometer recently?
- Did you chill the dough for at least 30 minutes?
Fix the one thing that applies to your situation, chill the dough regardless, and bake. You’ll see the difference on the first tray out of the oven.


Stay in the loop
Get the latest home cuisine delights updates delivered to your inbox.