The Real Reason Chicken Loses Its Moisture
Cooking chicken has gotten complicated with all the conflicting advice flying around. Brine it. Don’t brine it. Cook to 165°F. Pull it at 160°F. Cover it. Don’t cover it. Everyone’s got a system and half of them produce the same sad, stringy result.
As someone who cooked chicken at least four times a week for three solid years — boneless breasts, bone-in thighs, whole birds, slow cooker batches, the works — I learned everything there is to know about why it keeps drying out. Today, I will share it all with you.
But what is the dry chicken problem, really? In essence, it’s a physics issue. Muscle fibers contract when they hit heat above 140°F, and when they contract, they squeeze out stored water. That’s the whole mechanism. But it’s much more than that — because both temperature and time matter equally, and nobody leads with that detail. You can hit 165°F perfectly and still ruin the bird if you got there too slowly. You can also pull at 160°F and wreck it by leaving it on the burner for five extra minutes while you figure out what side dish you forgot to start.
Dry chicken isn’t bad luck. It’s a diagnosable problem — and the oven version fails for different reasons than the stovetop version, which fails differently than the slow cooker version. Once you know which method you’re actually botching, the fix is immediate. So, without further ado, let’s dive in.
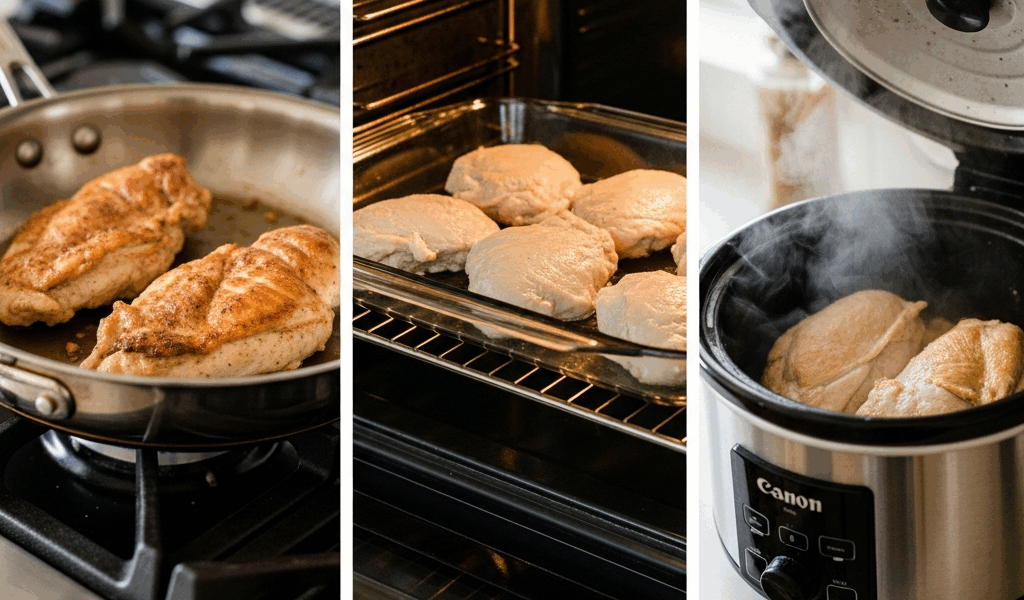
You Are Cooking It Too Long in the Oven
Oven chicken has one primary failure mode, and it’s printed in cookbooks everywhere: the time-per-pound rule.
Twenty to thirty minutes per pound at 375°F. Millions of home cooks treat this like gospel. They slide a four-pound bird in at 6:15 p.m., set a timer for 100 minutes, and expect dinner at 7:55 p.m. Then they cut into chicken that registers a perfect 165°F and wonder why it tastes like a bathroom sponge.
The rule isn’t wrong exactly — it’s that it assumes your oven heats evenly, every chicken behaves identically, and you’re fine eating meat that’s been cooking longer than it needed to. Don’t make my mistake. I followed that rule faithfully for eight months before I bought a $15 ThermoPro instant-read thermometer and discovered I’d been overcooking by 20 to 30 minutes, consistently.
The actual target is 160°F internal temperature, checked in the thickest part of the thigh without touching bone. Carryover cooking during the rest period brings it to 165°F on its own — and that rest period is non-negotiable. That’s when the muscle fibers relax and pull some moisture back in. Skip the rest and you’ve wasted the effort.
Boneless breasts are more vulnerable. High heat browns the exterior fast while the center lags. You see the surface isn’t golden yet, so you wait. By the time the outside looks right, the inside has been at temperature for fifteen minutes straight. Covering with foil or parchment for the first half of cooking fixes this — then uncover to brown. Or drop the oven to 325°F and roast uncovered the full way through. They’ll take 25 to 30 minutes depending on thickness. Check at 25. At 155°F, give it two more minutes. At 160°F, pull it immediately.
Probably should have opened with this section, honestly — bone-in thighs and legs are where new cooks should start. Dark meat has enough fat to forgive minor timing mistakes. The same logic applies, just with more breathing room.
Stovetop Chicken Has Its Own Set of Traps
Pan-seared chicken fails because high heat without a lid creates what I’d call a false choice. You think you’re choosing between raw and cooked. You’re actually choosing between raw and overcooked, and the window between them is about ninety seconds.
Here’s how it usually goes. You sear a breast in a cast iron skillet — say a Lodge 10-inch — over medium-high. The exterior browns beautifully in three to four minutes. You flip it. Other side browns. Then you cut a small peek and see pale, raw-looking meat in the center. So you crank the heat or just wait longer. The outside darkens toward burnt. The inside is still barely cooked. You panic and leave it on anyway. By the time it’s safe, the outside is charred and the inside pulls apart like old rope.
That’s what makes stovetop chicken so frustrating to us home cooks — it looks done before it is, then it’s genuinely overdone before you’ve had time to react.
The fix comes in two versions. First: sear for color, then drop the heat to medium-low, cover the pan with a lid or even a sheet of foil, and let it finish gently for eight to ten more minutes. The exterior holds. The interior catches up without the outer layers turning into hockey pucks. Second version: sear both sides hard for two minutes each, then transfer immediately to a 325°F oven for eight to twelve minutes depending on thickness. The oven is gentler, and the pan’s residual heat stops cooking the bottom.
Thin-sliced or pounded breasts — the pre-cut kind from Perdue or Trader Joe’s — cook in five to six minutes total. Most cooks are genuinely shocked by that. You’ll keep them on heat too long because you’re waiting for them to feel done. They were done four minutes ago. Use a thermometer. It’s the only way to actually trust yourself instead of guessing.
Slow Cooker Chicken Can Go Wrong Too
The assumption is that slow cookers always produce juicy results. Low heat, moist environment, hours of gentle cooking — what could go wrong? That’s true until it isn’t.
The most common mistake: boneless, skinless breasts on high for eight hours. Breasts are lean — there’s no fat to protect them. Eight hours of heat, even gentle heat, still denatures those muscle fibers. The meat shreds easily, which tricks you into thinking it’s tender. Then you actually eat it. It’s dry, just dry in a soft way instead of a chewy way.
Frustrated by yet another batch of shredded sawdust, I switched to thighs entirely in my Crock-Pot 6-quart slow cooker and never went back. Thighs have fat and connective tissue — they’re built to take long cooking. Cook them on low for six to seven hours with about an inch of liquid in the bottom. Enough to create steam. Not so much that you’re essentially poaching them in a closed pot — three-quarters full of broth gives you watery, mushy chicken that tastes like it was cooked inside a cloud.
I’m apparently a low-setting-only person and it works for me while the high setting never really does. You gain maybe two hours using high instead of low — four hours versus six — but you lose all your margin for error. It’s not worth it.
The secondary mistake is thinking liquid amounts are irrelevant because it’s a slow cooker. Too little and the surface dries out. Too much and you’re boiling the chicken inside a sealed container. The Instant Pot DUO Plus handles this more predictably — pressure locks in moisture differently — but standard slow cookers operate basically like a Dutch oven on low heat. Balance matters.
Quick Fixes That Actually Work Before You Cook
While you won’t need a culinary degree or professional kitchen equipment, you will need a handful of tools and about forty minutes of forethought. That’s it.
First, you should brine — at least if you’re working with boneless breasts, which have no fat layer to protect them. Wet brine: dissolve one-quarter cup of Morton kosher salt in one quart of cold water, submerge the chicken, refrigerate for two to four hours. The salt breaks down muscle proteins slightly, helping them hold water under heat. Dry brine is even simpler — about one-half teaspoon of salt per pound, rubbed all over the chicken, refrigerated uncovered for eight to forty-eight hours, then patted dry before cooking. The salt seasons all the way through and draws out a small amount of surface liquid that re-absorbs deeper into the meat. That was something I didn’t understand for two full years of cooking.
Room temperature matters more than most people think. Cold chicken from the refrigerator takes longer to cook evenly — the exterior starts drying out before the cold center has caught up. Pull it from the fridge thirty to forty minutes before cooking. That’s free moisture insurance.
A dry surface might be the best prep step of all, as stovetop chicken especially requires it. That is because surface moisture steams off instead of browning, and that steam holds excess moisture around the exterior edges — which sounds good but actually degrades texture and forces longer cooking times. Paper towels, thirty seconds of patting, and you’re set. Better browning means better flavor, which means less temptation to compensate by cooking longer.
Here’s the honest part: dry chicken is almost always a technique problem. Not the chicken’s fault. Not bad luck. You’re cooking it too long, too fast, or both — and now you know exactly which version of that mistake you’ve been making. Pick the method you use most often, find your error in one of these sections, and change it on your next cook. You’ll notice the difference immediately.

Stay in the loop
Get the latest home cuisine delights updates delivered to your inbox.