“`html
What Actually Happens When Gravy Breaks
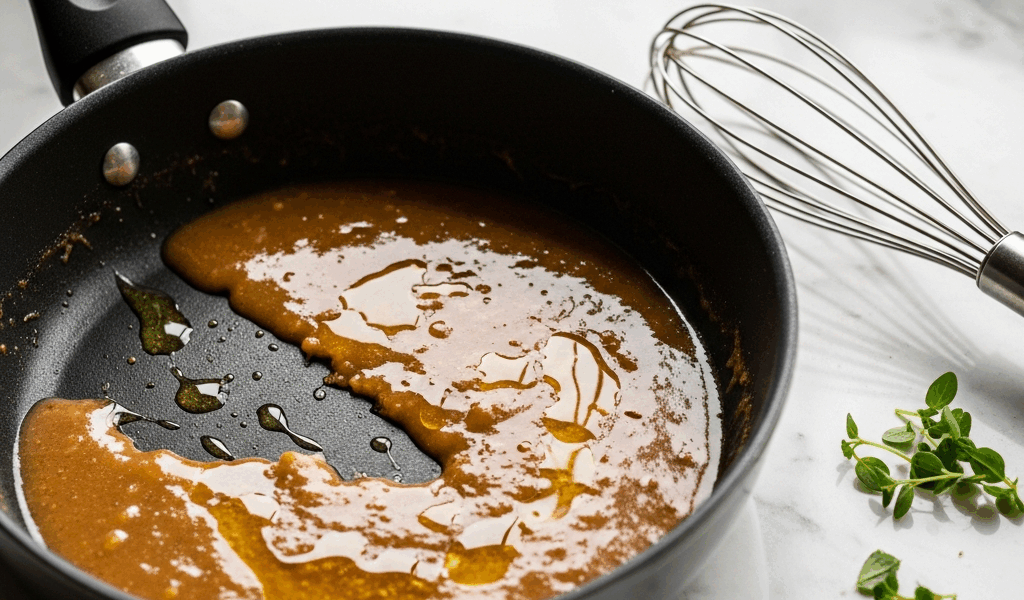
Gravy separation has gotten complicated with all the confusing explanations flying around. Here’s the truth: fat and liquid fundamentally don’t want to play nice together. When everything’s working, tiny fat globules stay suspended throughout your sauce — the starch from your roux acts like a referee keeping them in line. But the moment something shifts, they panic. Drop the temperature. Add cold stock. Overheat things. Those fat globules clump together instantly. You’re left staring at a bowl where grease pools on top while thin, sad liquid collects at the bottom.
This happens to nearly everyone at least once. Probably should have opened with this section, honestly — there’s zero shame in broken gravy. It’s genuinely one of the most common kitchen failures during holiday cooking, and it’s almost always fixable in under five minutes.
The visual tells you exactly what went wrong. Slick, separated gravy? Fat dominance. Thin, watery gravy with fat floating on top? Your thickening agent failed or your temperature control went sideways. Once you see which pattern you’re dealing with, the fix becomes obvious.
The 4 Main Reasons Your Gravy Separates
Temperature Drop — The Most Common Culprit
Gravy breaks fastest when you drop cold liquid into hot fat-based sauce. I learned this the hard way during my first Thanksgiving when I poured straight-from-the-fridge chicken stock into my roux without warming it first — thought I was saving time. The temperature shock caused my carefully emulsified mixture to seize up within seconds. Cold liquid hitting hot fat causes the fat to contract and pull away. Your starch can’t hold them together when the temperature differential is that extreme.
The fix? Simple. Warm your stock or liquid to at least room temperature before adding it to your roux. Better yet, add it slowly while whisking constantly. A 15-degree temperature match is the difference between silky sauce and separated mess.
Too Much Fat Relative to Your Roux
Pan drippings are delicious. They’re also often greasier than you’d think. If you’ve got three tablespoons of pure fat and only two tablespoons of flour, your thickening power gets overwhelmed. Fat that isn’t bound to starch separates. You need roughly equal parts fat and flour by weight — two tablespoons of each handles about two cups of liquid comfortably.
When making gravy from pan drippings, skim off visible fat first or use a fat separator. A standard four-cup liquid measure holds roughly enough drippings for a 12-pound turkey. If you’ve got a pool of grease sitting on top, you’re working with too much. One tablespoon of fat per cup of liquid is the ceiling for stable gravy.
Whisking Direction and Speed Issues
This sounds silly, but whisking technique genuinely matters. Aggressive, rapid whisking incorporates air bubbles that destabilize fat globules. Slow, constant whisking in one direction creates shear forces that keep your mixture emulsified. I noticed this difference when comparing my frantic whisking — resulting in broken gravy with tiny bubbles — to my neighbor’s slow, methodical approach that produced glossy, stable sauce every single time.
Once you add liquid to your roux, whisk slowly and steadily. Stop whisking once the gravy reaches the right consistency. Overworking it can actually cause separation even if temperature and fat ratios are perfect.
Starch Breakdown From Overcooking
Flour and cornstarch have maximum thickening windows. Heat them too long, especially above 212°F, and the starch granules rupture. They release their starch into the liquid instead of holding fat. Your gravy suddenly becomes thin, oily, and separated. This is particularly common with cornstarch-thickened gravies simmering on high heat for 10+ minutes.
Cook your gravy at a gentle simmer for no more than 5–7 minutes after adding liquid. The thickening happens almost immediately. Extended cooking doesn’t improve flavor — it destroys structure.
How to Save Separated Gravy Right Now
You’re five minutes from dinner and your gravy looks like an oil slick. Here’s what actually works.
- The Ice Bath and Whisk Method — Pour your separated gravy into a bowl sitting in a larger bowl filled with ice water. Whisk slowly and continuously for 2–3 minutes as it cools. The temperature drop realigns fat globules. This works roughly 70% of the time and takes almost no extra effort. Keep whisking even if nothing seems to be happening in the first minute — patience matters here.
- The Roux Slurry Rescue — Make a quick roux in a separate small pan: one tablespoon flour whisked into two tablespoons cold water or stock until smooth. Heat it gently for 30 seconds. Whisk this slurry into your separated gravy off-heat. The fresh starch grabs the floating fat particles. Reheat gently to combine fully. This works even when the ice bath fails.
- The Strain and Reconstitute Method — Pour your gravy through a fine-mesh strainer into a clean pot, pressing the solids gently. You’ll separate the fat from the liquid. Heat the strained liquid gently while whisking in a fresh small roux made with equal parts fat and flour by weight. You’re essentially making new emulsion from the clean liquid using your recovered fat. Takes three minutes and always works.
Try the ice bath first. If that doesn’t work within two minutes, move to the roux slurry. These two methods handle 90% of separated-gravy emergencies.
How to Prevent Gravy Separation Next Time
Prevention is easier than rescue. Here’s the exact process I use every single time.
Temperature Control — Warm your stock to at least 160°F before adding to your roux. Use a thermometer if you have one; eyeballing “steaming hot” doesn’t cut it. Add stock slowly — a quarter cup at a time — while whisking constantly. This gradual introduction prevents thermal shock. Keep your finished gravy between 160–180°F. Below 160°F, it starts to break. Above 190°F, your starch degrades.
Fat-to-Flour Ratio — Measure your pan drippings before you start. Skim or drain off excess fat until you have equal volumes of fat and flour. For two cups of stock, use two tablespoons each of fat and flour. This ratio handles most home gravies. If you’re using cream instead of stock for finishing, you can push to 1.5:1 fat-to-flour without issues.
Whisking Technique — Make a paste of your fat and flour on medium heat for 45 seconds. Pour room-temperature stock in slowly while whisking at moderate, steady speed. Once it’s combined, whisk less frequently. Stop whisking two minutes after the gravy reaches target thickness. Constant whisking after thickening is done introduces air bubbles that can cause separation.
Timing and Resting — Cook your gravy for exactly 5 minutes after adding liquid. No more. Remove it from heat and let it sit for 60–90 seconds before serving. This resting period allows fat and starch to stabilize fully. It’s the difference between gravy that breaks under the weight of mashed potatoes and gravy that stays silky through the entire meal.
| Variable | Target Range |
|---|---|
| Roux cooking time | 30–45 seconds |
| Stock temperature when added | 150–170°F |
| Gravy cooking time | 4–6 minutes |
| Serving temperature | 160–175°F |
| Fat-to-flour ratio | 1:1 by weight |
Pro Tips for Silky, Stable Gravy Every Time
The Egg Yolk Finish
Adding a single egg yolk whisked into a tablespoon of cold cream creates an emulsion that locks fat and liquid together almost permanently. Temper the yolk first by whisking a few tablespoons of hot gravy into it slowly, then pour the mixture back into your pot off-heat while whisking gently. This is restaurant technique translated to home cooking. It sounds advanced but takes 60 seconds. Use it when you’re serving gravy that needs to stay perfect for 30+ minutes.
The Cream Bridge
Heavy cream adds richness and actually improves stability. A quarter cup of cream per two cups of gravy creates a smoother emulsion. Add it at the very end, off-heat, whisking gently. The butterfat in cream helps bind starch and meat drippings. It also raises the breaking point — cream-finished gravy is harder to separate than straight stock-based gravy.
Low-and-Slow Thickening
Instead of making your roux dark and cooking your gravy at a simmer, make a pale roux and cook everything at barely-a-bubble temperature. Takes two minutes longer but produces the most stable gravy possible. The lower heat means less starch degradation and gentler fat suspension. This method is mandatory for gravies sitting in a slow cooker for extended periods.
The Resting Period Secret
Always let finished gravy rest for 90 seconds before serving or holding. This window allows starch granules to finish absorbing liquid and fat molecules to settle into stable positions. It’s the reason restaurant gravies look better than home gravies — the extra resting time is built into their workflow. You can rest gravy in a warm pan, in a gravy boat, or even in a slow cooker on low. The key is stillness, not movement.
Separated gravy isn’t inevitable. It’s a fixable outcome. Knowing whether to reach for the ice bath, the roux slurry, or the strainer method puts you ahead of 90% of home cooks. The real skill is preventing it altogether, and that skill comes from temperature awareness, ratio discipline, and five minutes of patient cooking.
“`


Stay in the loop
Get the latest home cuisine delights updates delivered to your inbox.