The #1 Reason Your Baked Chicken Turns Out Dry
I’ve ruined more chicken breasts than I care to admit. One Sunday three years ago, I pulled a pan from the oven, sliced into what should have been a juicy chicken breast, and found something that resembled a hockey puck. The internal temp read 178°F — that’s when I learned the most expensive lesson about baked chicken. You’re probably cooking it too hot and too long.
Here’s what’s actually happening inside the meat. Chicken breast is about 75% water. The proteins are coiled structures holding onto that moisture like a fist. Heat it to 165°F (the USDA safety threshold) and the proteins denature, start squeezing out water. But push past 165°F — say 170°F, 175°F, higher — you’re actively expelling moisture that has nowhere to go in a baked chicken. It just evaporates. Gone.
Most home cooks don’t factor in carryover cooking. When you pull chicken from a 400°F oven, the residual heat keeps cooking the interior for another 5–8 minutes depending on thickness. A chicken breast reading 160°F when removed climbs to 165–167°F while resting on the counter. But if you cook it to 165°F in the oven, you’re actually targeting something that’ll exceed 170°F after carryover. Dry chicken.
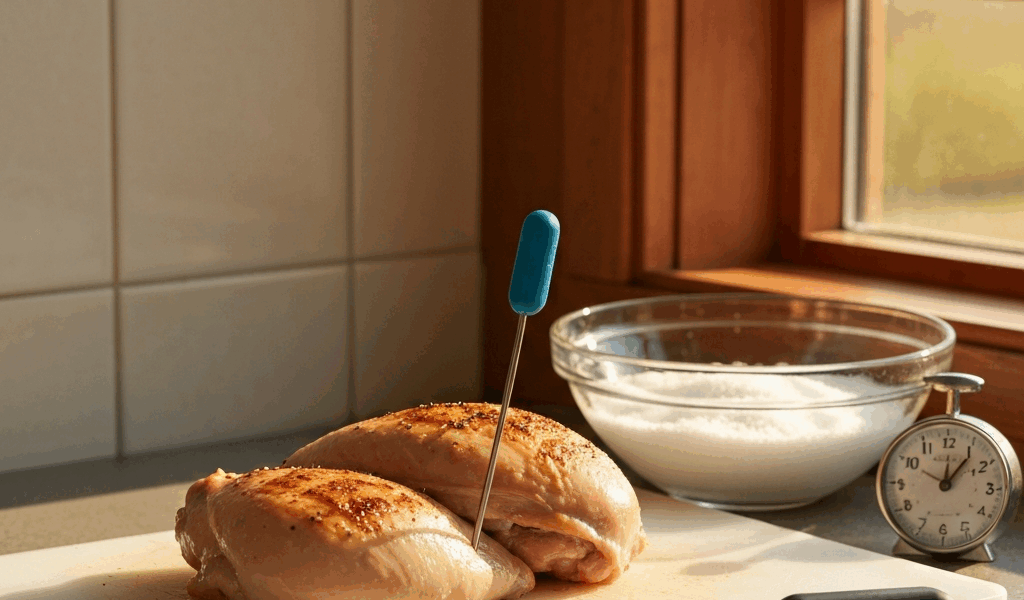
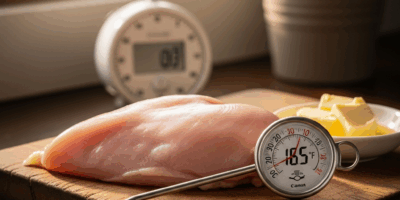
The solution is mechanical and non-negotiable: buy a meat thermometer. Not guesswork. Not “it looks white inside.” Not timing based on weight alone. The Meater Plus runs $99, or grab a basic Lavatools Javelin for $30 — both work fine. I use the Javelin because it’s fast and the probe is thin enough not to create a massive exit wound in the meat. Insert it into the thickest part of the breast without touching bone. Target 160°F. Remove. Rest for five minutes. That carryover climbing brings you safely to 165°F without overshooting.
Probably should have opened with this section, honestly — it fixes roughly 70% of dry chicken complaints immediately.
How Skipping Brining or Seasoning Affects Moisture
Salt does something most home cooks don’t understand. When salt penetrates chicken, it dissolves muscle proteins and changes their structure so they retain water more effectively during cooking. This isn’t just seasoning for flavor — this is a structural change that makes the chicken physically hold onto moisture it would otherwise release.
I tested this directly. Two chicken breasts, identical weight at 7.2 oz each, same oven at 375°F, same thickness at about 1.5 inches, same thermometer check at 160°F internal. One brined for just 30 minutes in a solution of 1/4 cup salt dissolved in 2 cups water. One went straight into the oven. The brined chicken sliced cleanly with visible juice pooling on the plate. The non-brined chicken crumbled slightly, drier texture obvious on first bite. Both hit the same internal temperature. The difference was salt’s molecular effect on protein structure.
You don’t need an overnight brine. A 30-minute minimum does something. Two hours does more. Here’s the actual recipe I use: dissolve 1/4 cup kosher salt in 2 cups warm water — or 1/4 cup table salt in 3 cups water if that’s what you have, since table salt is denser. Submerge your chicken breasts completely. Let them sit. Remove, pat dry, and bake. That’s it. No added flavor, just moisture retention — though you can add 2 tablespoons brown sugar and a few peppercorns if you want something more complex.
If brining feels like extra work, season your chicken aggressively with salt at least 40 minutes before cooking. Not five minutes before. Not right before. 40 minutes minimum allows salt to penetrate past the surface. Kosher salt works best because the larger crystals dissolve slower, giving you a wider window. I use Diamond Crystal brand because the crystals are smaller than Morton’s, so salt distributes more evenly across the meat.
Here’s where most people fail: they season, then immediately bake. The salt sits on the surface, doesn’t penetrate, contributes nothing to moisture retention. Give it time. Step away. Come back when it’s ready to go in the oven.
Oven Temperature Problems That Dry Out Chicken
Your oven is probably lying to you. I discovered this after moving into an apartment with a 1987 Westinghouse electric oven. Set it to 375°F and an oven thermometer showed 410°F. Thirty-five degrees difference. That explains why every chicken I baked there came out overcooked.
Oven temperature accuracy isn’t guaranteed — especially in older ovens, cheap ovens, or ovens that haven’t been calibrated in years. The dial is a suggestion. Nothing more. Buy a basic oven thermometer (Rubbermaid brand runs about $8) and check what your oven actually runs at. Place it in the center, preheat for 20 minutes, and look at the actual temperature versus what the dial claims.
If your oven runs 25–50 degrees hot, adjust downward. Recipe calls for 375°F but your oven actually reaches 410°F? You’re cooking chicken way too fast. The outside browns rapidly while the interior is still undercooked, so you extend cooking time to reach proper internal temperature, and by then the outside has dried out completely. Vicious cycle. Ruined chicken.
For baked chicken breasts, aim for 375–400°F actual oven temperature — not dial temperature. Thicker pieces can handle 350–375°F. Thinner cutlets need 400–425°F to cook through before the outside dehydrates. The Maillard reaction (browning) needs sufficient heat, but excessive heat creates a moisture-sealing crust that steam-cooks the interior, deteriorating the texture.
Uneven heat zones are another reality most people ignore. The back-right corner of your oven might be 20 degrees hotter than the front-left. Halfway through baking, rotate your pan 180 degrees. This simple move prevents one side of chicken from overcooking while the other side catches up.
How to Fix Dry Chicken You Already Cooked
Sometimes you’re already standing there with a plate of dried-out chicken. Recovery is possible, but limited. Realistic expectations matter here.
Shredding plus sauce is your best bet. Take that dry chicken, shred it finely with two forks, and mix it into something wet — salsa, BBQ sauce, pasta sauce, cream sauce, or even chicken salad with mayo. The sauce masks the texture problem and adds back the moisture that cooking removed. I once salvaged an entire pan of overcooked chicken breasts by shredding them into a pan of warm marinara. It became a decent pasta dish. Not what I originally planned. Not inedible either.
Pan-searing thin slices works if the chicken is still somewhat tender. Slice against the grain into 1/4-inch pieces, sear them quickly in butter or oil with high heat — 2 minutes per side — and finish with a pan sauce made from butter, lemon juice, broth, and garlic. The searing adds texture back. The sauce adds moisture. This doesn’t resurrect the chicken into “perfectly cooked” territory, but it becomes acceptable in a composed dish.
Conversion to soup or salad is honest about limitations. Dice the chicken, add it to chicken salad with mayo, celery, onion, and dried fruit, and the mayo-based dressing compensates entirely. Or throw it into broth-based soup where the liquid environment makes dryness irrelevant. This approach works because you’re explicitly adding moisture as a core component, not trying to hide a moisture deficit.
Your Baked Chicken Dryness Prevention Checklist
- Use a meat thermometer. Target 160°F internal temp in the thickest part. Remove from heat. Allow 5 minutes carryover cooking before checking final temp (should reach 165°F).
- Brine or salt in advance. Either brine for 30 minutes minimum in saltwater, or salt aggressively 40+ minutes before cooking. Don’t skip this step expecting surface seasoning to handle moisture retention.
- Verify actual oven temperature. Place an oven thermometer inside, preheat 20 minutes, and compare dial reading to actual temperature. Adjust cooking temp downward if oven runs hot.
- Bake at 375–400°F (actual temperature, not dial setting). This range browns chicken adequately without accelerating moisture loss.
- Rotate pan halfway through. Most ovens have hot spots. Rotating eliminates uneven cooking.
- Choose appropriate oven time based on thickness. A 1.5-inch breast at 375°F needs roughly 20–25 minutes. Thinner cutlets need 12–15 minutes. Thicker pieces need 28–35 minutes. Time varies by oven accuracy, so thermometer confirmation is non-negotiable.
- Rest chicken for 5 minutes after removing from oven. This allows carryover cooking to complete and gives the meat time to reabsorb some surface moisture.
Dry baked chicken isn’t a mystery. It’s the result of specific, fixable errors — overcooking past 165°F, skipping salt’s moisture-retention effect, using inaccurate oven temperature, or baking too fast. Address these factors and your chicken stops being dry. That Sunday when I pulled that 178°F chicken from the oven? Never repeated that mistake since. A meat thermometer and a pre-bake salt application solved it permanently.

Stay in the loop
Get the latest home cuisine delights updates delivered to your inbox.